Ever scrolled through Instagram and wondered how home bakers create those intricate, professional looking patterns on their cakes without spending hours piping? The secret is simpler than you think: cake stencils.
Whether you're decorating your first birthday cake or running a growing home bakery, cake stencils let you achieve detailed, bakery quality designs in minutes. No advanced piping skills required. In this step by step guide, we'll walk you through everything from choosing the right stencil to mastering five different stenciling techniques that will make your cakes look like they came straight from a professional bakery.
What Are Cake Stencils?
Cake stencils are thin, flat sheets, typically made from food safe plastic or acetate, with patterns cut into them. You place the stencil against a frosted cake and apply a medium (like royal icing, cocoa powder, or buttercream) over the cutout areas. When you peel the stencil away, a clean, detailed design is left behind on your cake's surface.
They come in a huge variety of designs: floral patterns, geometric prints, lace borders, honeycomb textures, damask patterns, and even custom text. If you're looking for a variety of high quality, reusable stencils, you can explore Bakeyy's cake stencil collection which features intricate patterns perfect for both beginners and experienced decorators.
Why Every Baker Should Own Cake Stencils
Before we dive into the how to, here's why stencils deserve a permanent spot in your baking toolkit:
They save time. What takes 45 minutes with a piping bag takes under 5 minutes with a stencil. For home bakers filling multiple orders, this is a game changer.
They're beginner friendly. You don't need steady hands or years of piping practice. If you can hold a scraper and spread icing, you can stencil.
They create consistency. Every cake comes out looking identical. This is essential if you're building a brand or taking repeat orders for events like weddings and festivals.
They're reusable. A good food grade plastic stencil can be washed and reused dozens of times, making it one of the most cost effective decorating tools you can own.
What You'll Need: Tools and Supplies Checklist
Before you start, gather these essentials. Having everything ready means you can work quickly, and speed matters with stenciling.
A cake stencil in a pattern that suits your occasion. Bakeyy's reusable cake stencils come in popular patterns like lines and dots, honeycomb, floral, and lace, all in the standard 15x39cm size that wraps around most 6 to 8 inch cakes.
An icing scraper or palette knife is what you'll use to spread your medium across the stencil. A firm, straight edged cake scraper gives the cleanest results. Flexible scrapers work too, but a stiff edge is easier to control for beginners.
A cake turntable is not strictly required, but it makes the job significantly easier when stenciling the sides of a cake. A smooth spinning turntable lets you wrap the stencil around your cake seamlessly without lifting and repositioning.
Royal icing, buttercream, or cocoa powder as your choice of medium depends on the technique you're using (we'll cover all five below).
Piping bags are handy for applying icing onto the stencil before scraping. Disposable piping bags keep cleanup fast.
Tape or pins to secure your stencil in place while working, especially for side designs.
Step by Step: How to Use a Cake Stencil on the Side of a Cake
This is the most common and impressive use of cake stencils, creating a beautiful pattern that wraps around the entire side of your cake. Here's how to do it right:
Step 1: Frost and Chill Your Cake
Start with a smoothly frosted cake. Apply a crumb coat of buttercream, chill for 20 minutes, then apply your final coat. Smooth it using your scraper and turntable. Now, and this is critical, chill the cake for at least 30 minutes in the freezer or 1 to 2 hours in the fridge. The frosting needs to be firm to the touch. If it's soft or tacky, your stencil will stick to the icing and ruin both the base coat and the stencil pattern.
Step 2: Wrap the Stencil Around the Cake
Gently press the stencil against the chilled cake. The cold buttercream will have just enough tack to hold the stencil in place. If the stencil slides, use a small piece of food safe tape at the overlap. Make sure the stencil sits flush against the surface with no air gaps. Gaps lead to icing seeping underneath, which creates a messy print.
Step 3: Prepare Your Icing
For side stenciling, royal icing or a stiff buttercream works best. The consistency is everything: you want it slightly thicker than toothpaste. Too runny and it will bleed under the stencil. Too stiff and it won't spread smoothly or will crack when the stencil is removed. Add food colouring at this stage if you want a contrasting design.
Step 4: Apply the Icing Over the Stencil
Using your scraper or palette knife, spread a thin, even layer of coloured icing over the stencil's cutout areas. Here's the technique that separates clean results from messy ones: always scrape in one direction, pulling the icing firmly across the stencil. Avoid going back and forth, which pushes icing underneath the edges. One confident pass is better than three hesitant ones.
Step 5: Remove the Stencil
Without waiting too long (the icing shouldn't dry completely), gently peel the stencil away from the cake in one smooth motion. Pull it straight off and don't drag it sideways. If you're working on a turntable, slowly rotate as you peel.
And that's it. You should have a clean, detailed pattern pressed into your cake. If there are small imperfections, you can touch them up with a fine brush or toothpick. Most of the time though, the result looks beautiful as is.
5 Different Cake Stencil Techniques to Try
The side icing method above is just one approach. Here are four more techniques that use the same stencils but create completely different effects:
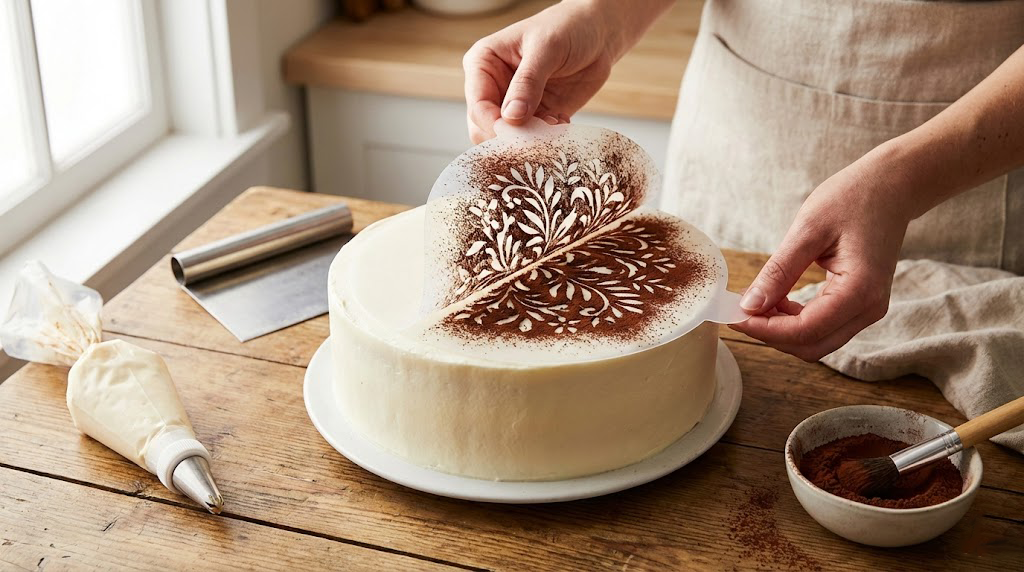
1. Powdered Sugar or Cocoa Powder Dusting (Easiest)
This is the simplest technique and perfect for absolute beginners. Place your stencil on top of a frosted or unfrosted cake, then sift powdered sugar, cocoa powder, or edible glitter over it using a fine mesh sieve. Carefully lift the stencil straight up to reveal a gorgeous pattern. This works beautifully on chocolate cakes with white powdered sugar, or on vanilla cakes with cocoa. No icing skills required at all.
2. Royal Icing Stenciling (Most Common)
This is the technique we described in the step by step above. It produces raised, textured patterns that look incredibly professional. Royal icing dries hard, so the design becomes permanent and holds up well during transport. This is an important consideration if you're a home baker delivering cakes to customers. You'll want your nozzle sets and piping bags nearby for any detailed touch ups.
3. Buttercream Stenciling
Similar to royal icing, but using coloured buttercream instead. The advantage is that the pattern stays soft and edible (some people find royal icing too hard). The disadvantage is that buttercream doesn't hold as sharp a definition. Pro tip: use a slightly chilled buttercream for cleaner edges.
4. Edible Spray Stenciling
Place your stencil on fondant or a smooth buttercream surface, then spray edible colour spray over it from about 15 to 20cm away. This creates a flat, painted effect, almost like an airbrushed design. It's excellent for creating subtle, elegant patterns on wedding cakes or festive cakes. Work in a well ventilated area and cover your workspace, as the spray can be messy.
5. Sprinkle and Textured Stenciling
For a playful, textured look, place your stencil on a freshly frosted (still slightly tacky) cake and press sprinkles, edible glitter, or crushed biscuit crumbs into the cutout areas. The sprinkles stick to the fresh frosting beneath the stencil, creating a fun, three dimensional pattern. This technique is fantastic for kids' birthday cakes and festive designs.
Common Cake Stenciling Mistakes (and How to Avoid Them)
Even experienced bakers run into issues with stenciling. Here are the problems we see most often and exactly how to fix them:
Icing bleeding under the stencil. This almost always means your icing is too thin, your base coat isn't chilled enough, or the stencil isn't sitting flush against the cake. Fix: thicken your icing, chill longer, and press the stencil firmly before applying.
Stencil sticking and pulling away the base coat. Your base frosting is too soft or sticky. Fix: freeze the cake for 10 to 15 extra minutes before stenciling. The surface should feel firm and dry to a light touch.
Uneven or patchy pattern. You're not applying enough icing, or you're scraping too lightly. Fix: don't be shy with the icing. Apply a generous amount and let the scraper do the work in one firm pass.
Pattern cracking or breaking when the stencil is removed. Your icing has dried too much before removal. Fix: work faster, and peel the stencil off within 30 to 60 seconds of applying the icing.
Choosing too complex a pattern for your first attempt. Intricate lace designs look amazing but require a confident hand and properly chilled cake. Start with bold geometric or stripe patterns and work your way up to detailed florals and lace.
Which Stencil Patterns Work Best for Different Occasions?
Choosing the right pattern matters just as much as the technique. Here's a quick guide to help you match stencils to occasions:
Weddings and Engagements: Lace, damask, and floral patterns in white on white or metallic gold create an elegant, timeless look. Use the edible spray technique with lustre dust for a subtle shimmer.
Birthdays: Bold geometric patterns, polka dots, or stripes work well with bright, contrasting colours. Pair with fun cake boxes for a complete presentation if you're gifting or delivering.
Festive Occasions (Diwali, Eid, Christmas): Traditional motifs, mandalas, and intricate patterns shine during festivals. Pack your festive cakes in beautiful hamper boxes or gift bags for a premium presentation.
Everyday and Casual: Simple stripes, honeycomb patterns, or leaf designs add elegance without looking overdone. The honeycomb pattern stencil from Bakeyy is a great starting point for daily baking.
How to Clean and Care for Your Cake Stencils
Proper care means your stencils will last for years. Here's what to do immediately after each use:
Clean right away. Don't let icing dry on the stencil. Rinse under warm water immediately after peeling it off the cake. If the icing has started to set, soak the stencil in warm soapy water for 5 to 10 minutes before gently rubbing it clean with a soft sponge.
Avoid scrubbing with abrasive pads. Steel wool or rough sponges can scratch the surface and damage the fine pattern edges. Use a soft cloth or your fingers.
Dry flat. Lay the stencil on a clean, flat surface to air dry. Don't crumple or fold it while wet because this can permanently warp the plastic and cause uneven contact with your cake next time.
Store flat or gently rolled. Keep your stencils in a drawer or folder where they can lay flat. If space is limited, roll them gently and never fold.
Take Your Cake Decorating to the Next Level
Cake stencils are just one tool in a baker's arsenal, but they're one of the most impactful for the effort involved. Pair them with a solid set of decorating essentials and your cakes will look like they came from a high end patisserie.
Here's a quick toolkit to complement your stenciling:
A reliable cake turntable for smooth, even frosting. A set of cake scrapers, both straight edged and patterned, for base coats and finishing. Piping nozzle sets and piping bags for borders, writing, and detailed accents around your stenciled design. Quality cake stencils in a variety of patterns so you have options for every occasion. And for those finished masterpieces, the right cake boxes to deliver them safely.
You can find all of these, along with hundreds of other baking supplies, packaging materials, and decorating tools, at Bakeyy's bakeware collection. Whether you're a beginner setting up your first home bakery or a seasoned decorator looking for wholesale supplies, it's a one stop shop built for bakers like you.
Frequently Asked Questions About Cake Stencils
Can I use cake stencils on buttercream cakes?
Yes, absolutely. The key is to chill the buttercream until it's firm before placing the stencil. Buttercream is actually one of the most popular bases for stenciling because the slight tack helps hold the stencil in place.
Do I need a turntable for cake stenciling?
For top of cake stenciling (like dusting cocoa powder), no. A flat surface works fine. For wrapping a stencil around the side of a cake, a turntable makes the job significantly easier and produces cleaner results.
Can I use cake stencils on fondant?
Yes. Fondant provides a smooth, firm surface that's ideal for stenciling. You can use royal icing, edible sprays, or dusting powders over the stencil on fondant. Just make sure the fondant is fully set before applying the stencil.
What icing consistency works best for stenciling?
Aim for a consistency slightly thicker than toothpaste. Too thin and it bleeds under the stencil; too thick and it won't spread smoothly. Test on a piece of parchment paper first if you're unsure.
How do I stencil the top of a cake?
Place the stencil flat on the top surface of your chilled cake. Sift cocoa powder, powdered sugar, or edible glitter over it. Lift the stencil straight up, carefully, to reveal the pattern. This is the easiest stenciling technique and works beautifully for quick decoration.
Can beginners use cake stencils successfully?
Stencils are one of the most beginner friendly decorating tools available. Start with a simple geometric pattern and the powdered sugar dusting technique. Once you're comfortable, move on to royal icing stenciling for more defined, raised designs.
Where can I buy cake stencils online in India?
You can shop for a wide variety of reusable, food safe cake stencils at Bakeyy.com, which offers wholesale pricing and delivery across India. They stock popular patterns including honeycomb, lines and dots, floral, and lace designs.